Blender Make Right Mouse Select Again
Whatever new software tin be daunting to get into, especially something with so much functionality as Blender. In this article, I accept you lot from installing Blender, having a look at the basic functions of the interface all the mode through modeling a chair and applying textures to it. I hope it's articulate, if non please let me know. Have fun!
1 - Installing Blender
There's several ways to install Blender. The most common fashion is to install the current stable release, which yous can observe here. That's the official Blender Foundation page. However, Blender is constantly in evolution and yous can get a new version pretty much daily - over here. This is where you can go a gustatory modality of new and exiting features. Keep in listen that this version of Blender may crash, so don't use it for important piece of work. The installation procedure of an experimental version of Blender is dissimilar: you download a Nada-file, which you and so have to unzip. You tin and so navigate to the unzipped folder and click on the "Blender.exe" executable file, which will start Blender. You can have many different versions of Blender on your computer similar this, they won't interfere with each other. if you are into games, you may be familiar with the Steam platform - yous can get Blender there too. The benefit is, information technology will update automatically.
2 - The interface
Any new computer interface is daunting. Although explaining every function of the interface will accept more than 1 written article, we tin distinguish some important parts in this image:
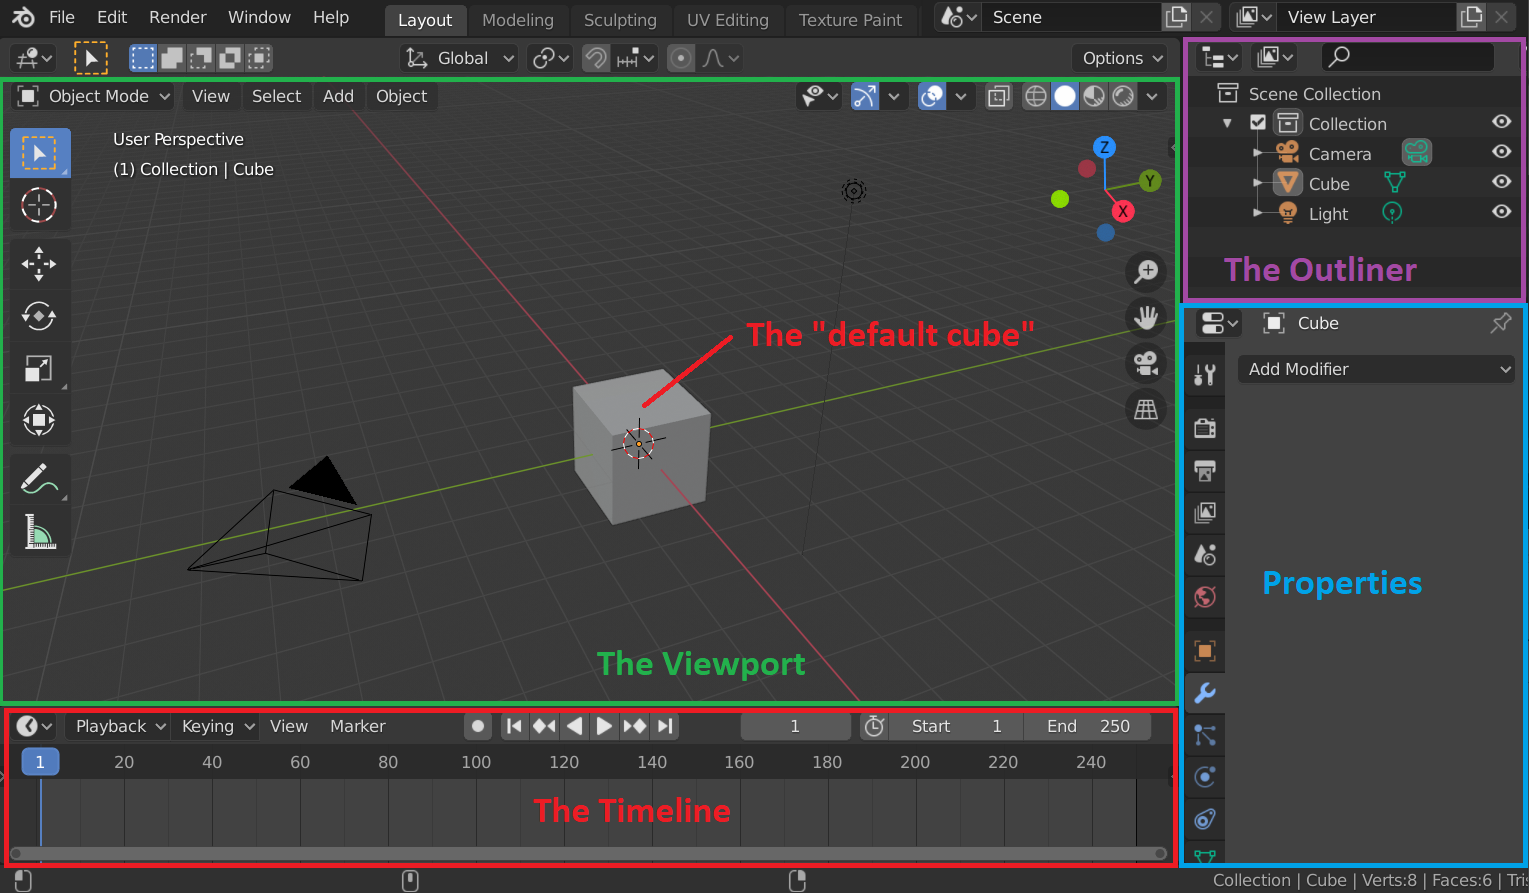
The Blender interface at offset glance.
The adept news is, you won't demand to know what everything is to go started. Lots of fun can be had right away! Hither'due south an caption of these key parts of the interface:
-
The Viewport - this is where your 3D models are visible. Blender ever starts with a "default cube", which most people will just select and delete (by pressing Ten) correct way. But in fact you can transform this cube into whatever you like. The viewport is where you add item to the model manually, and where y'all transform the objects (transform means to move them, rotate them or scale them).
-
The Backdrop tab - this is where you tin can add materials to your object, manipulate them with "modifiers" (more on this later) and choose your render output path, amonst many other things.
-
The Timeline - when you lot press the Spacebar, you lot'll find that the blueish playhead starts to move from left to correct. If there was whatsoever animation in your scene, y'all would offset to run into information technology now. Press the Spacebar again to terminate playback.
-
The Outliner - this is where you find all of your objects, including the camera and any lights that may exist in your scene. By default Blender gives you lot 1 photographic camera and one low-cal, in addition to the default cube.
3 - Viewport Navigation
Press down the middle mouse button and move your mouse. You'll see that you are rotating the viewport around your model. Roll the middle mouse button and you'll zoom in and out.
Don't have a 3-button mouse, or are you on a laptop? Don't worry. Go to Edit > Preferences > Input and enable "enable 3-button mouse". Shut the Preferences window. Now, y'all can rotate past property downwardly Alt and the left-mouse-button. Zoom in and out by holding the Ctrl+Alt and left-mouse-button and moving the mouse. In fact, even though I take a 3-button mouse and work primarily on a desktop estimator, this is how I prefer to navigate in the viewport.
Select something like the default cube by left-clicking on it. Left-click on an empty space in the viewport to deselect information technology.
four - Modeling nuts
Enough boring interface talk! Let's make a 3D model already! Okay, okay… here's some modeling basics though.
-
Edit Fashion and Object Mode - Pressing the TAB cardinal switches between these two of import modes. In Edit Mode, you lot can manipulate a model's vertices, edges and faces (more about that below). Manipulating these things is "3D modeling", in its most basic form. You need to be in Object Way for other things, like adding Modifiers to your model (more about that later on). A model consists of these things:
-
Vertices - these are points in 3D space. Perchance the nigh important things in 3D modeling! The edifice blocks of every 3D object.
-
Edges - these are lines that "connect the dots", or connect the vertices in this instance.
-
Faces - too called "polygons" in other software, these fill the spaces between edges and vertices. The faces are what y'all see in the render - the vertices and edges past themselves are invisible without faces.
Endeavor going into Edit Modernisticeastward past pressing TAB. left-clicking on a vertex selects it. Press "G" (for "take hold of"… I know) moves the vertex around. You are at present changing the shape of the default cube. Congratulations, yous've fabricated your first 3D model! It'southward some kind of cube!
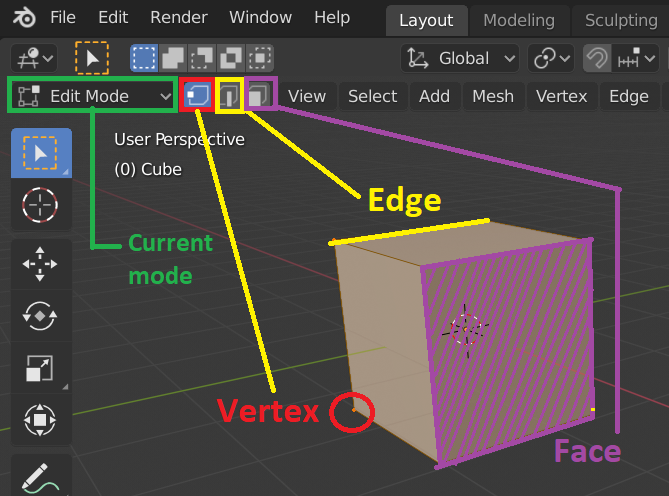
Vertex, Edge and Face in Edit Way.
5. Modeling nuts: Edge Loops, Beveling, Extruding.
The all-time way to acquire is by doing - so permit'southward brand a model.
In Edit Mode, printing three to go to Face selection mode (not 3 on the numpad, the other 3). Select the top Face up past left-clicking on information technology.
At present press Ctrl+i. If nothing happens, make certain you lot exercise this while the mouse cursor is above the 3D viewport - Blender is very context-sensitive, meaning that hovering above different menus, it will heed to different keyboard shortcuts that match that menu.
Normally, Ctrl+i will invert your selection. So now only the height Confront is not selected. Press Ten to bring up the Delete menu, and choose Faces. You now only have the top Confront left.
Select the Face again by left-clicking on information technology, and press E to extrude it. Move the mouse up to extrude upwards.

Extrude the Face upward by pressing Eastward and moving the mouse cursor up.
Nice work! Press 2 to go to Edge Select mode. Now press Ctrl+R. This is another shortcut you will be using constantly while 3D-modeling. You will discover it creates an "Edge Loop" in the centre, either on the left or right side (depending on where your mouse cursor was at the fourth dimension of pressing Ctrl+R). Left-click once to confirm that you desire to create the border loop, then right-click to cancel moving it. This style, it stays in the centre, where we desire it.
Do this over again, but place your mouse cursor on the other side so you lot end up with two edge loops going direct through the eye.

Where the mouse cursor is depends where you will create some other "edge loop".
At present, we're going to select both Edge Loops. Nosotros can exercise this by alt+left-clicking on the edges. This will select the unabridged loop. Hold Shift and select the other loop besides. Note: if y'all are using "enable 3-button mouse", double-clicking on an edge will select the loop instead.
With both border loops selected, press Ctrl+B to "bevel" them. Move the mouse to increase the Bevel size, until you lot get something similar what is shown below. Left-click to ostend the bevel.

Beveling the border loops by pressing Ctrl+B.
At present, press 3 to go once again to Confront select mode. Select the faces shown below:
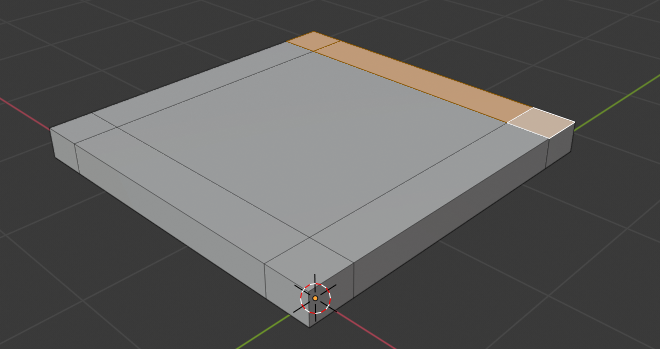
Select the faces as shown in orange.
Printing E for Extrude and move the mouse until you lot get something like this:

Extruding the selection upwards. Left-click to confirm. Can you judge what yous're making nevertheless?
Left-click to confirm the extrude action. Navigate the viewport then that you tin can see underneath the model either by holding the Middle Mouse Push and moving the mouse or by holding Alt and moving the mouse. Select the 4 small faces at the corner.

Select the 4 small faces at the corners of the bottom of the model.
Can you lot guess the next step? Press Due east to extrude again, and move the extruded faces down. Congratulations, yous've just modeled a chair!
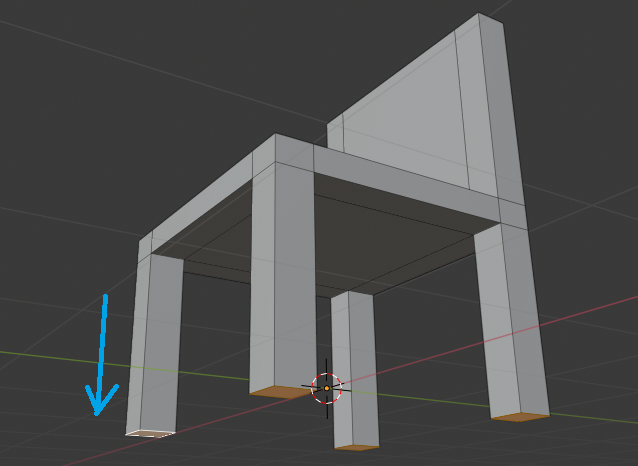
Extruding the selected faces downward - hey, it's a chair!
Press TAB to exit Edit Way. Well done, you've fabricated a 3D model. Honestly, these are the basics that will proceed coming back in even very complex models: selecting, adding edge loops, extruding, beveling. That'due south why I am teaching y'all the keyboard shortcuts instead of telling you to use the Tool card.
6. Modifiers
In the perfect globe of 3D models, everything has sharp corners. In reality, this is not the case. In fact, all objects, no matter how perfect, have a little flake of a "bevel" where the edges meet. Permit's add some Bevel to our chair so information technology looks more realistic.
Get to the Modifiers Tab by clicking on the wrench icon in the Properties panel. (remember, make sure you are in Object Mode and that the chair is selected). Click on "Add Modifier" and choose "Bevel".
The Bevel will probably be way to stiff, so nosotros'll demand to subtract the "Offset" value to something like 0.01.

Notice the subtle bevel effect, which catches the light at an angle. This adds realism.
Neat! But now something else starts to become apparent: our chair is a bit grey. Would exist dainty, if we can give it a material.
vii. Materials and textures
Go to the Materials tab (the Sphere icon) and click on "New". Don't worry about all the settings that appear, let's merely change the color for now.

Creating a dark-brown material for our chair.
This looks okay, and you can motility on to the next step if you want. But maybe you desire it to be a flake more realistic. This is where textures work really well. This next footstep is a scrap advanced, but I'll explicate every step then stay with me here…
First, you'll demand a nice photo texture. The website textures.com has many free photographic textures. Let's utilize this woods 1. The "small" version is free, and it'due south more than big enough for our purpose. Salvage it somewhere that's piece of cake to discover.
Next, expand the Timeline a fleck past dragging the edge betwixt the Timeline and the Viewport up. Then, change that Timeline to a Shader editor by clicking on the window type icon in the top left corner of the Timeline window and choosing "Shader Editor". Now you lot see your material there - but it's probably very tiny, and so zoom in by scrolling the middle mouse wheel.
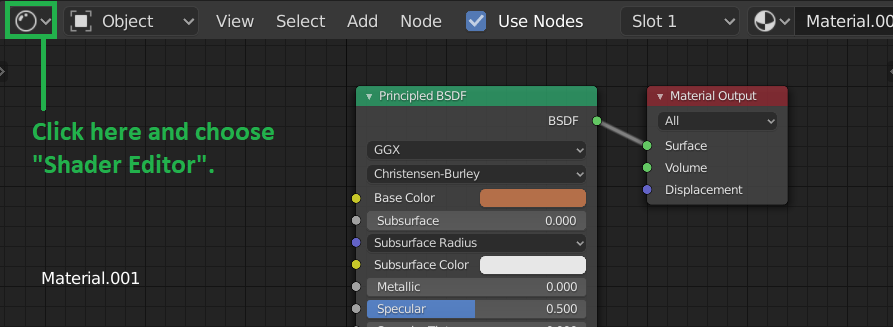
Turning the Timeline into a Shader Editor.
To make things easy to set up, get to Edit > Preferences > Add together-ons and search for "Node Wrangler". Make sure it is turned on. Close Preferences.
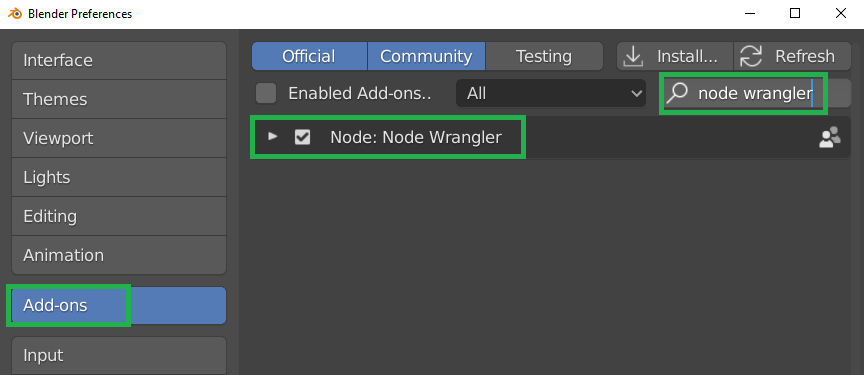
Making sure the Node Wrangler improver add-on is enabled in Preferences.
Okay, let's become back to that Material in the Shader Editor. Select the material by left-clicking on the "Principled BDSF". Now printing Ctrl+T to add a whole bunch of "nodes" to that. Yous may need to motion them to the side a chip by pressing 1000 (simply like yous would move an object in the viewport).

Pressing Ctrl+T adds all these "nodes". Add your image texture by clicking on "Open".
At present we can encounter our photo texture appear on our 3D model, merely it looks pretty strange! That's because we didn't "unwrap" our 3D model, and it doesn't have a proper UV map. "Unwrapping" a 3D model is beyond the scope of this commodity, so let's cheat and exercise information technology the clever style instead!
Change the Texture Coordinate to "Object" by dragging the output from that to the input of the Mapping node. Change the Paradigm texture projection type to "Box" and ready the Blend value to 0.25. Change the Scale of the texture to 0.v. If that'due south disruptive, just make it expect like pictured below:

Irresolute to "Box Project".
Essentially what you've done now, is set the material to "Box projection mapping", which means that the picture of forest is projected onto our model from all sides. The "Alloy" value blends the pictures where they meet at an angle. This is a really quick cheat for static models like this chair. By now, it should look something like this (don't worry about the background, that's explained in the next part):

Your chair with a wood texture.
Y'all're welcome to skip ahead to the next part, simply if you desire even more realism I advise you lot stick around and add some more than "nodes". We'll do it step-by-step. Here we go!
Press Shift+A (with the mouse over the Shader Editor window) and type "colorramp" in the search field until the ColorRamp node is listed. Click on that and connect it betwixt the paradigm texture and the Roughness input like this:

Calculation a ColorRamp node inbetween the epitome texture output and Roughness input.
Zoom in a bit on your chair and rotate the viewport so you tin run into the reflection y'all are getting. Tweak the ColorRamp until you lot get something nice like this:

Some interesting Roughness caused by calculation and tweaking the ColorRamp node.
This looks much more than interesting already! It looks as if some parts of the wood are more shiny, and others are more rough. Absurd. At present, let'southward add together a terminal touch. Add together a "Crash-land" node past pressing Shift+A and searching for it, like you lot did with the ColorRamp node. Add information technology equally shown between the image texture and the Normal input.

Connecting the Bump node.
You will certainly have to decrease the Distance value to something like 0.01. As you lot tin can see this adds some "crash-land" to the model, based on the epitome texture.

The Bump issue shows some subtle surface bumps based on the image texture.
8. HDRI light
With our textile taken care of, permit's add some light! HDRI lights are a cracking way to add realistic light to your scene, and it's so like shooting fish in a barrel it'south nearly like a "cheat". First, yous'll demand to download an HDRI image. You tin get many gratis ones from HDRIhaven.com, such as this 1: Artists workshop.
Download information technology (the 1K version will do fine) and relieve information technology somewhere that you lot can easily detect.
Side by side, get to the World tab (the planet icon) and click on the dot next to the Color value. Choose "Environment texture" from the options. Don't worry about the pink color, that's Blender's manner of telling you there's no image texture yet. Click on Open to find your HDRI prototype.

Setting up the HDRI environment texture.
Now you should exist seeing the Artists workshop HDRI in the background. Notice that it's also providing lighting for our model, which is its chief part.
9. Camera
Let'due south take a wait through our camera. Later on all, that'south where Blender will exist looking through when it's rendering your image.
Printing 0 (goose egg) on the numpad to switch to Photographic camera view. Y'all'll notice that the composition isn't exactly great, only when we attempt to motion the view we immediately become out of camera view again. If that happens, press 0 again to go back to Photographic camera view. Press North to open the Option panel and in the View tab, enable "Lock Camera to View".
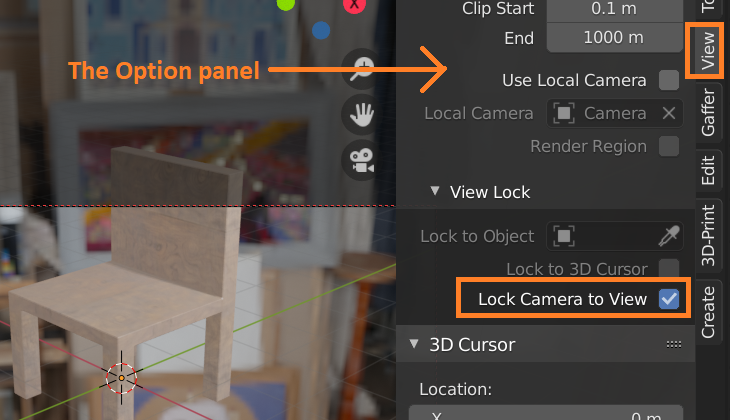
Turning on "Lock Camera to View" in the Option panel.
Now that View is locked to Camera, you can move the camera view as you would the normal viewport.
ten - Rendering and saving your image.
Now that the photographic camera is taken care of, printing F12 to return an paradigm.

The rendered paradigm.
After a few seconds, the rendered paradigm will appear. Become to Image > Save as and save it somewhere.
If you don't desire to have the HDRI as a groundwork, you tin turn on "Transparent" under the "Film" options. This will return the image of your model, with a transparent background.

Turning on the "Transparent" option.
Brand sure to save information technology every bit a PNG file with "RGBA" enabled. The A stands for Alpha, which is the information in the prototype that determines where the image is transparent. You can and so open it in Gimp or Photoshop for example, and add together a different background.

Choosing the PNG and RGBA options when saving the image.
Well, that's it - y'all've gotten familiar with the Blender interface after downloading it, and even made your beginning 3D-model including a realistic photographic material and rendered an image using an HDRI as lighting. Pretty complex stuff for a beginner! Well washed.
If yous desire to learn more, a expert place to get started is one of the Youtube playlists i've fabricated, which you can find on this page. For case, the one about 3D modeling would be a prissy place to outset.
The 883-page book could likewise keep you busy for a while. Information technology's great for beginners and advanced users - at that place's accelerate topics, but they are explained step-past-stride but like in this article. Or merely download the free 30-folio e-book right now!
Source: https://www.blendersecrets.org/secrets/how-to-use-blender
0 Response to "Blender Make Right Mouse Select Again"
Post a Comment